Serve Sklearn Model With FastAPI
I had been hearing a lot of good things about FastAPI, most notably on the Python Bytes Podcast, so I decided to give it a go, and see what all the fuss was about.
While I’ve written integrations with a number of API’s, I don’t have much experience creating them (beyond some basics in vanilla Flask, or setting up callbacks in Falcon). So primarily this was a learning exercise to see what’s involved behind the curtain. FastAPI’s clean implementation, together with the very useful documentation, made getting started with it quite straightforward.
Additionally, I wanted to start exploring some areas surrounding taking Machine Learning models into production. Serving the model as an API is almost always one of the top suggested methods. So this mini project seemed like the perfect blend.
In this post we will
Construct a simple classification model using Sklearn
Persist the model and the environment used to construct it
Create a well documented API to serve the persisted model
Constructing the example classifier
Let’s start off by creating the classifier. I’m using the well known Titanic data set for illustrative purposes. Here are the key exerts from my Jupyter Notebook
import pandas as pd
from sklearn.svm import SVC
from sklearn.impute import SimpleImputer
from sklearn.preprocessing import StandardScaler, OneHotEncoder
from sklearn.linear_model import LogisticRegression
from sklearn.model_selection import train_test_split
from sklearn.pipeline import Pipeline
from sklearn.compose import ColumnTransformer
from sklearn.preprocessing import OneHotEncoder

# import the data
df = pd.read_csv(
    'https://gist.githubusercontent.com/michhar/2dfd2de0d4f8727f873422c5d959fff5/raw/'
    'fa71405126017e6a37bea592440b4bee94bf7b9e/titanic.csv'
)

# create the training and testing data
df_y = df['Survived']
df_X = df.drop('Survived', axis=1)

X_train, X_test, y_train, y_test = train_test_split(df_X, df_y, random_state=42)


# Create a preprocessing pipeline to ready the data for fitting a model
numerical_cols = ['Age', 'SibSp', 'Parch', 'Fare']
numeric_transformer = Pipeline(steps=[
    ('imputer', SimpleImputer(strategy='median')),
    ('scaler', StandardScaler())
])

categorical_cols = ['Pclass', 'Embarked', 'Sex']
categorical_transformer = Pipeline(steps=[
    ('imputer', SimpleImputer(strategy='constant', fill_value='missing')),
    ('onehot', OneHotEncoder(handle_unknown='ignore'))
])


column_trans = ColumnTransformer(
    [
        ('cat', categorical_transformer, categorical_cols),
        ('num', numeric_transformer, numerical_cols)
    ],
    remainder='drop'
)

# Naively train a simple Logistic Regression Classifier
clf = Pipeline(steps=[('preprocessor', column_trans),
                      ('classifier', LogisticRegression())])

clf.fit(X_train, y_train)

score_clf = clf.score(X_test, y_test)


# Naively train a Support Vector Classifier
clf_2 = Pipeline(steps=[('preprocessor', column_trans),
                        ('classifier', SVC())])

clf_2.fit(X_train, y_train)

score_clf_2 = clf_2.score(X_test, y_test)
Now we have some working classifiers, not particularly optimal ones in many number of ways, but suitable for demonstration, and easily extensible
Exporting the model
One of Sklearn’s dependencies (joblib) comes with a built-in export function
# model export
from joblib import dump
dump(clf_2, 'clf_2.joblib')
which can then be easily imported like so
from joblib import load
clf = load('clf_2.joblib')
During development, I just pip installed the latest version of the packages I needed at each stage of the development. Sklearn recommends, when persisting a model, not to load it back into a different version. So I needed to make sure to store that information as part of my API development.
One can use the built in pip freeze command, to save the version of the installed packages in the environment you are working in
python -m pip freeze > requirements.txt
This though stores the exact versions of all sub-dependencies of the packages I installed too, which can cause too much clutter.
Instead, I used a little project called pip-chill to do a similar thing, but only for the top level packages I installed directly
pip-chill > requirements.txt
I then added in fastapi to leave me with a requirements.txt file like this:
# original model dev packages
jupyter==1.0.0
pandas==1.1.2
pip-chill==1.0.0
scikit-learn==0.23.2

# api
fastapi[all]
Exposing the model via FastAPI
In order to serve results of our classifier via an API we will need to * Accept a new instance to classify * Use our model to predict the class of this instance * Return the classification our model gave
from enum import IntEnum, Enum
from typing import Optional

from fastapi import FastAPI
from fastapi.encoders import jsonable_encoder
from pydantic import BaseModel
from joblib import load
import pandas as pd
First we set up the expected format we want to receive the instance, which we will predict the class of, using pydantic
When receiving data via an API, one typically receives data in the JSON format which does not natively support all types. The code below defines how the JSON string will be deserialized into a python object that we can work with in our code.
class PClass(IntEnum):
    first = 1
    second = 2
    third = 3


class Embarked(str, Enum):
    S = 'S'
    C = 'C'
    Q = 'Q'


class Sex(str, Enum):
    male = 'male'
    female = 'female'


def to_camel(string: str) -> str:
    return ''.join(word.capitalize() for word in string.split('_'))


class Passenger(BaseModel):
    passenger_id: int
    pclass: PClass
    name: str
    sex: Sex
    age: Optional[float] = None
    sib_sp: int
    parch: int
    ticket: str
    fare: float
    cabin: Optional[str] = None
    embarked: Optional[Embarked] = None

    class Config:
        alias_generator = to_camel
Additionally, FastAPI can use the Pydantic model to check if the data received from the API user matches our expectations, and if not it provides useful error message responses about what went wrong.
The aliasing is used to convert from typical python snake_case to CamelCase
which is how the features were named in our training dataset
Then we also define what our API responses will look
class PassengerResponse(Passenger):
    prediction: bool
We load our model in:
clf = load('clf_2.joblib')
Now we have all the building blocks we need, the remaining setup of the API is simple, we just instantiate our app, and define the endpoints our API will have
app = FastAPI()


def pydantic_model_to_df(model_instance):
    return pd.DataFrame([jsonable_encoder(model_instance)])

# Define the endpoint and it's response format
@app.post("/predict/", response_model=PassengerResponse)
async def predict(passenger: Passenger):
    # convert the data into the format expected by our model
    df_instance = pydantic_model_to_df(passenger)

    # run the inference/prediction
    prediction = clf.predict(df_instance).tolist()[0]

    # construct the response of the API
    response = passenger.dict(by_alias=True)
    response.update({'Prediction': prediction})
    return response
As the model was trained on a pandas df, and the pipeline used to build it
contains code that manipulated the columns of the dataset by name, the
model expects to receive a dataframe with the same named columns. Hence
the use of the CamelCased alias in the model, and the helper function
pydantic_model_to_df to provide the last step of converting the instance we
received from the API to the format expected by our model (that is not already
handled by pydantic)
Running our API app (assuming the code was in a file called model_api.py) in
a development mode is then as simple as
uvicorn model_api:app --reload
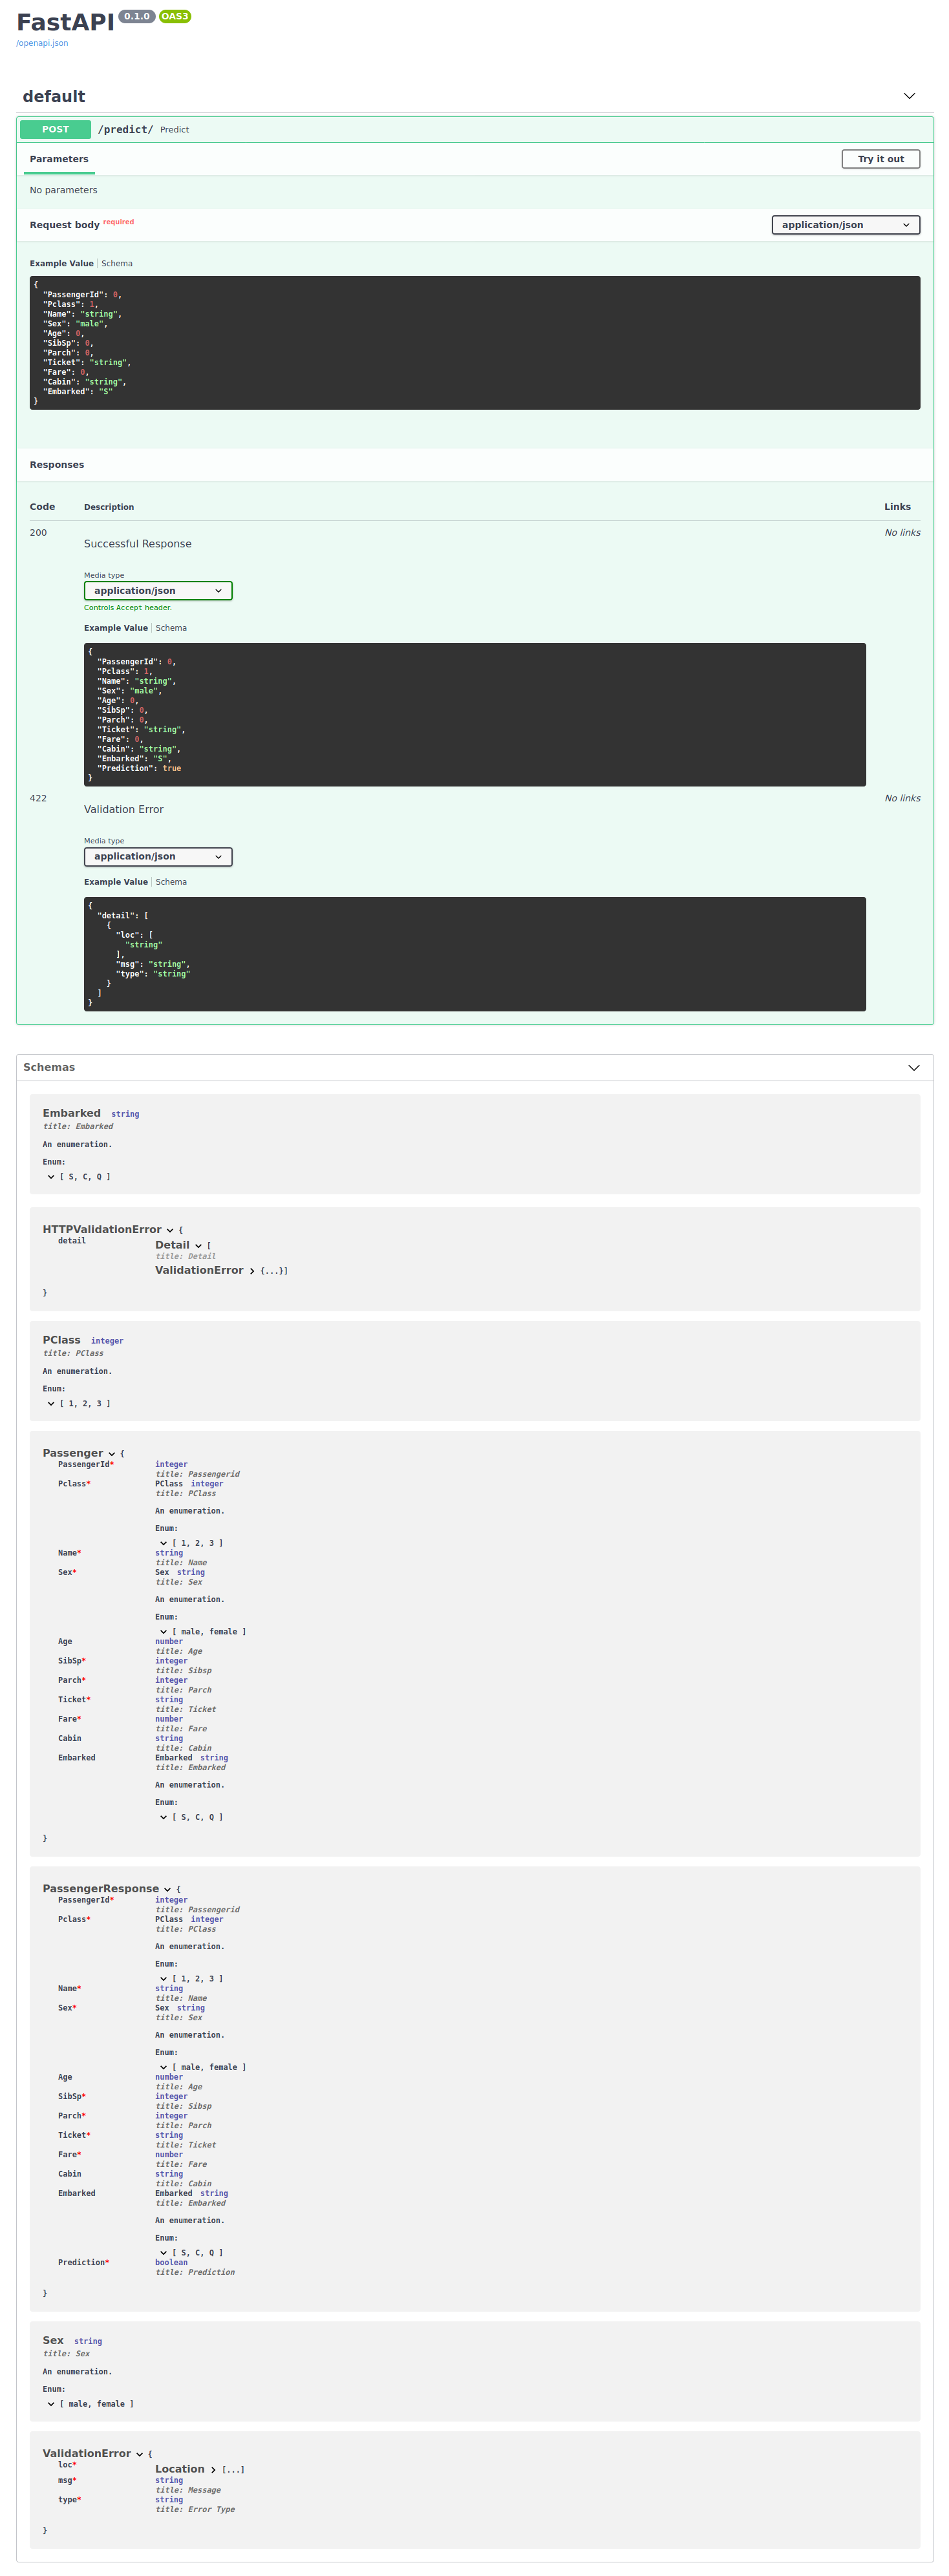
Then at http://127.0.0.1:8000/docs you will find very useful, interactive
documentation that enables you to see how your api behaves and try out calling
it. I highly encourage you to check it out! I used it extensively during development of this example to see how
my api looked and behaved to iterate quickly.
FastAPI has great documentation, so I will divert you to that to learn the building blocks of setting up an API using the library